C# Snippets for VS2005
If you’re new to Visual Studio you’ll eventually find out about snippets, think they’re cool, and sigh at all of the code that you used to cut and paste manually. If you use C# you’ll suddenly feel cheated when you see how many snippets are in VB.NET and how few are in C#. Here’s the cure.
[Update] It seems some of the info I provide about how to Manager and Add Directories in the Code Snippet Manager is already provided by Microsoft. Oh well, my info should be clear too.A lot of snippets are provided by Microsoft in .VSI files. Download as many of these as you can find. Code snippets are stored in directories that related to general function. If you open VS and go to menu>Tools>Code Snippets Manager, you’ll find there are a lot more folders for VB than C#.
To create a new folder to organize your snippets, use the Add button, then navigate to My Documents\Visual Studio 2005\Code Snippets\Visual C#. Now add a new directory with the button on the dialog, let’s start with "Application". As soon as the directory is created, click Open. Do the same for directories:
– Collections
– Connectivity
– Database
– File System
– Operating System
– Security
– XML
(there are others available but this is a good start)
Don’t worry if you don’t see a new folder in the manager after adding, select Visual Basic in the language listbox and then come right back and you’ll see they’ve properly populated the list. Now just click OK on the Code Snippet Manager dialog to save the new empty folders. There’s no need to close down Visual Studio.
Now for those .vsi files… Double click a file to launch the Visual Studio Content Installer. The filename should correspond to one of the directories you’ve created above. You’ll get a plain text EULA box – the "Microsoft Permissive License" agreement is agreeable and benign, click Accept. I see no need to uncheck any of the snippets on the next page, leave them all checked and click Next.
You’ll see a left pane with all of the snippets, note the blue icon for each, and the right pane will have all of the available folders. You should see the new ones you created. If you did not create the folders then you will only have the option to add all of the new snippets to some existing category like "Refactoring" or "My Code Snippets". This is completely unacceptable if you need to find these things for development, which is why I started with creating the categories.
It’s a little non-intuitive but each snippet can be put into a separate category. This is great if you get a miscellaneous collection of snippets that you need to manually categorize, but for our purposes all snippets go into one category. So you can single click one snippet, then ctrl-A to Select All, then just click the appropriate category in the right pane, so that for example, all of your Application.vsi snippets go to the Application folder. As soon as you check the right pane you’ll see the icon change in the left pane for each item so that you know the items have been allocated to a category (nice touch).
Click Next to get to a final confirmation, then Finish on the install page, then Close when done.
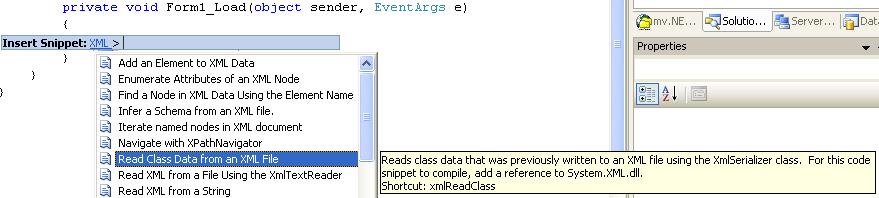
To use your C# snippets, anywhere in an existing item (code, XML, etc), right click to see the normal context menu. Left click on Insert Snippet to see all of your categories. Use the mouse, or arrow keys and space bar, to select the category and snippet. Note the extended tooltips with info about the snippet, for example you might see an instruction to add a reference to a namespace so that the snippet will work. The image below shows what this looks like in the code editor (you can enlarge this if you care):
This is really hot stuff! Enjoy! 
1 thought on “C# Snippets for VS2005”
Leave a Reply
You must be logged in to post a comment.
I accidentally deleted a legitimate comment and blog account because they looked like spam. I was wrong. An apology was sent to bpoojary, who is coordinator for the snippet2vsi project at CodePlex. Here is the info that was posted…
Best converter for snippet to vsi converter can be downloaded from http://snippet2vsi.codeplex.com