DesignBais Tip – Radio Buttons
Welcome to the first product usage tip for DesignBais on this blog! Radio buttons are mutually exclusive, round check boxes. Selecting one of them unsets all of the others. DesignBais does not yet natively support radio buttons, but we can simulate them using the image technique for toolbars and other controls (to be discussed in another tip).
Note that you can group checkboxes to create the radio button selection effect, but then you can’t use a process after event with them – and who wants square radio buttons anyway? 
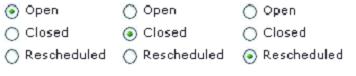
Rather than using actual controls as provided in DesignBais, we’re going to display images to represent them. There are only two images used for radio buttons, one is an empty circle and the other is a circle with a dot inside to indicate it’s selected. 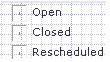 Regarding the image to the right, since the images have been given names that we can reference from code, rather than using file names, we don’t see any image at design-time, but when the files names are assigned at run-time, they look just like “real” HTML controls. To toggle the radio controls when the user clicks one of them, the code that handles the PROCESS.EVENT “IMAGE” would set all images to unselected, then reset the selected image with the image with the dot. To reset to a default condition, this code also needs to be executed when the form is first displayed, in AFTER.WRITE, and other events. Here are screen shots of the Open/Closed/Rescheduled radio buttons after clicking on each one:
The logic behind the image click will vary with each application. The code to toggle buttons can be made generic so that you can manipulate any group of N controls. It’s up to you whether you use a CALL to get to that code and pass parameters, INCLUDE the code, or copy the code in-line for each application and then modify for specific needs. I can help with this sort of coding as part of a Nebula R&D service engagement.
For the application which includes these radio buttons, I reset the contents of a dropdown list as each radio button was clicked, and conversely, the radio buttons changed when the dropdown list selection changed. This demonstrates the sort of control interaction that’s possible with DesignBais.
As to where to get the on/off images? Find a radio button anywhere on the internet and use ctrl+PrintScreen to save an image of the page. Paste that into PC Paint or your favorite image editing software. Select the segments of the image that you want, and save them with appropriate On and Off names. You can use plain circles like I did above, or you can use little lightbulbs, smily/frown faces, up/down light switches, different colors… Use your imagination!
I hope this tip has been useful. There are lots more that have been written, I just need to get them properly formatted. Expect one per week or so.